Console walkthrough: UDN private subnet
This is a visual tour of the same private-subnet demo from
the step-by-step guide, built through
console.grn.cloud's native creation flows instead of oc apply.
It's not a self-contained set of instructions - some of the console's forms don't map 1:1 onto
the CLI guide's manifests, and one setup step (below) needs a cluster admin. If you want to
follow along end to end, use the CLI guide; use this page to see what each step
looks like in the browser.
Everything shown is a real, captured screenshot from an actual run - not a mockup.
Before you start
A UserDefinedNetwork can only go on a new namespace, and the
k8s.ovn.org/primary-user-defined-network label that activates it has to be set at namespace
creation time - a ValidatingAdmissionPolicy blocks adding it later. Regular self-service
project creation doesn't expose that label, so a cluster admin needs to pre-create the two
namespaces (udn-demo, udn-demo-probe) with the label already in place, using the same
namespace-udn-demo.yaml
manifest the CLI guide applies. Everything after that - the UDN, the VMs, the NetworkPolicies -
is ordinary namespace-scoped admin access, clickable by any user with a RoleBinding to those
two namespaces.
1. Ease of use
The UDN and VirtualMachine each get a dedicated, purpose-built creation flow. NetworkPolicy
doesn't - in this console version, Create NetworkPolicy opens a YAML/JSON editor rather than a
visual rule-builder, pre-scoped to the right namespace and apiVersion so you're not starting from
a blank file:
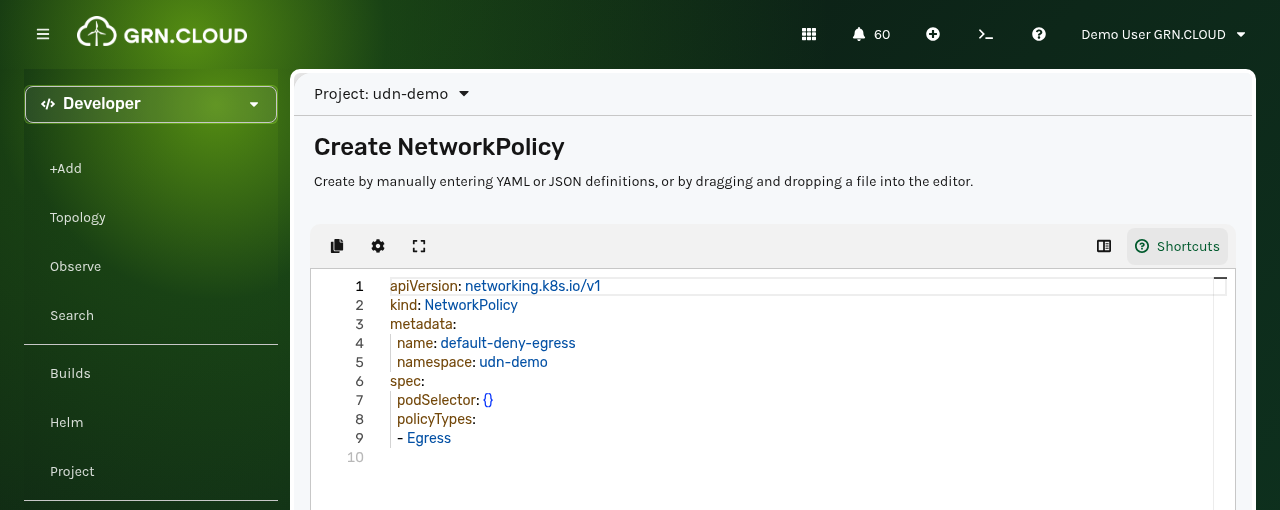
The same flow (with different name/spec) creates all three NetworkPolicy objects from the
CLI guide: default-deny-egress, allow-https-dns-egress, and allow-intra-namespace-egress.
The UDN, by contrast, has its own two-field modal - reached via Search → filter by
UserDefinedNetwork → Create, not a left-nav entry:
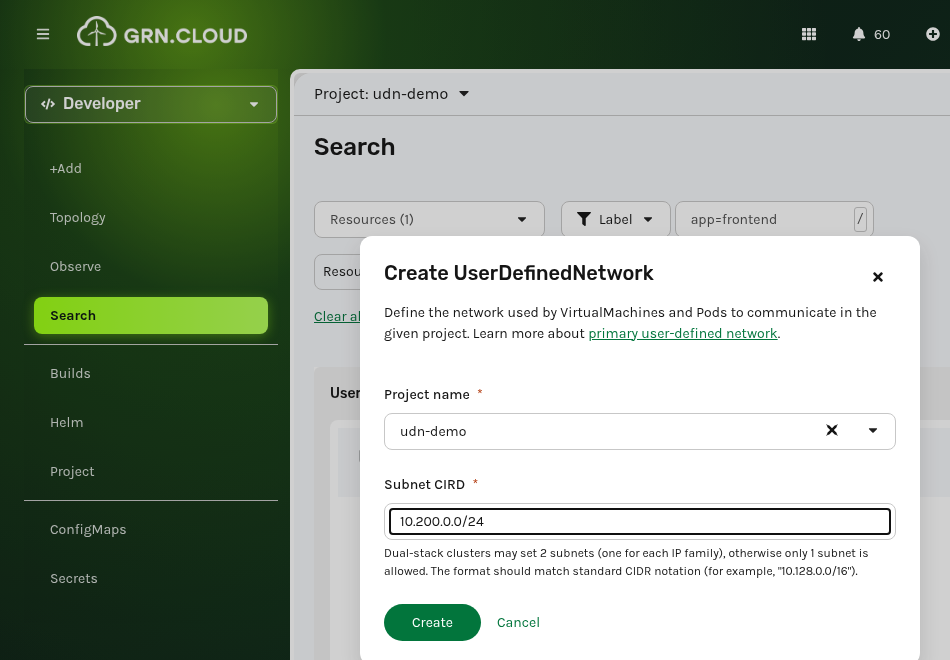
Two things differ from the CLI guide's userdefinednetwork-private-subnet.yaml: the console
form only takes a Project name (the field opens empty - it has to be explicitly clicked and
selected, it isn't pre-filled from your active project) and a Subnet CIRD (that's the live
label text, an upstream typo for CIDR) - no topology/role/ipam fields are exposed, so the
resource this form creates ends up named primary-udn, not private-subnet. Functionally it's
the same Layer2/Primary UDN either way.
The VirtualMachine wizard is the closest to the CLI's manifest - name, boot source, size, disk, storage class:
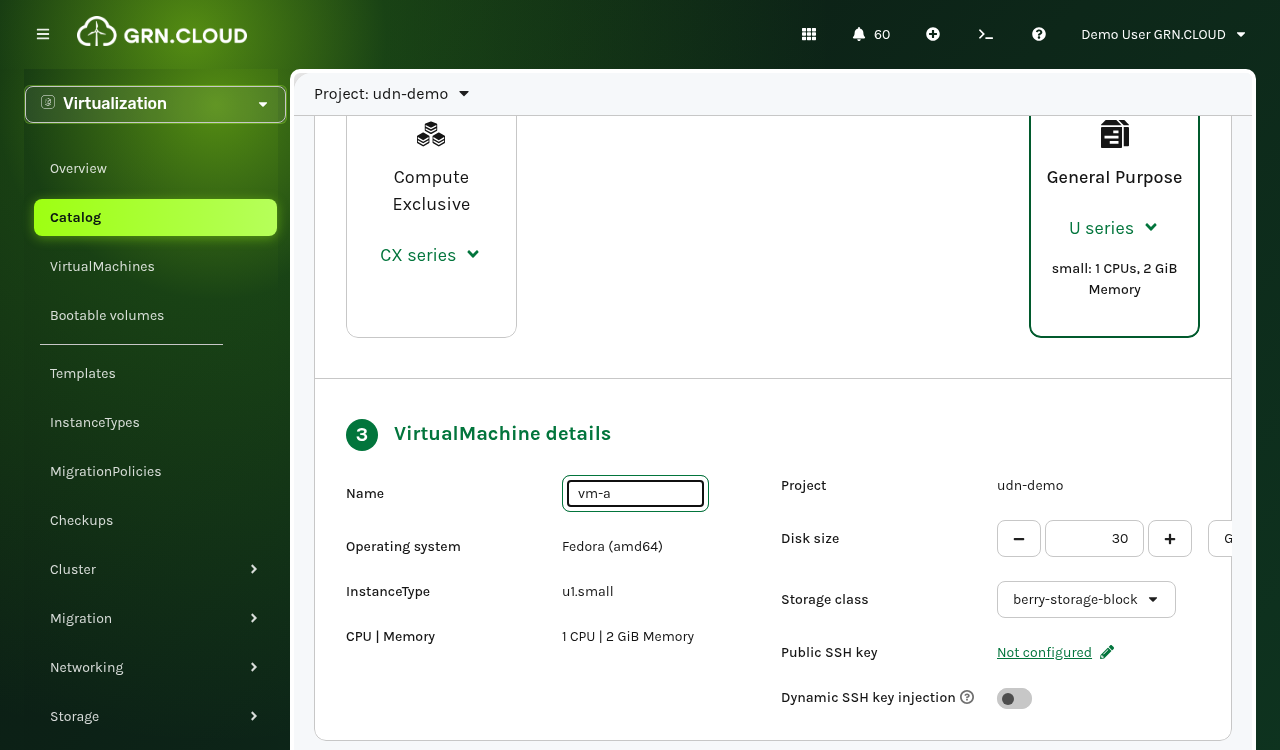
One catch: this wizard's default network interface binding (l2bridge) didn't hand out a DHCP
lease to the guest in this environment. To get a working VM, switch to the wizard's Customize
VirtualMachine flow, open its YAML tab, and set bridge: {} under
spec.template.spec.domain.devices.interfaces instead - that's what actually produced the
working vm-a/vm-b shown in the rest of this page.
Once everything's created, the project's Topology view shows the whole picture at a glance:
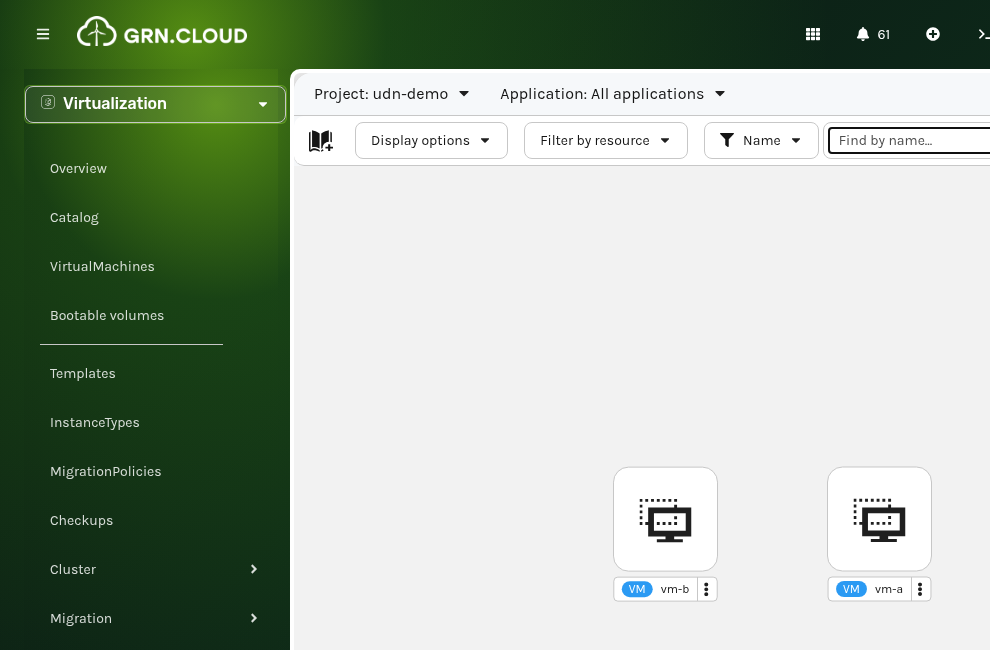
2. Isolation, by default
From the probe pod's built-in Terminal tab - outside the udn-demo namespace, on the default
pod network:
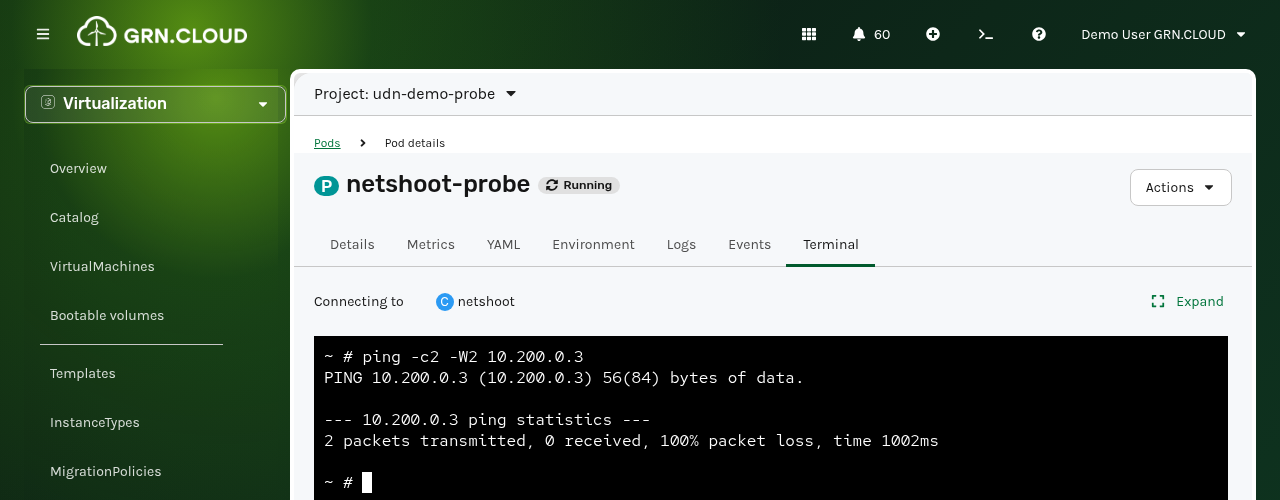
ping -c2 -W2 10.200.0.3 from the probe pod times out completely: 2 packets transmitted, 0
received, 100% packet loss. (That's vm-a's address as captured at this step, before the
Customize/YAML rebuild above changed it to the 10.200.0.5 seen in the later screenshots - the
underlying result is the same either way.) This is before any NetworkPolicy is even part of the
picture - the private subnet is unreachable from outside because the UDN is the namespace's
primary network.
3. Peer connectivity inside the subnet
From vm-a's own console tab (OpenShift Virtualization's in-browser VNC console):
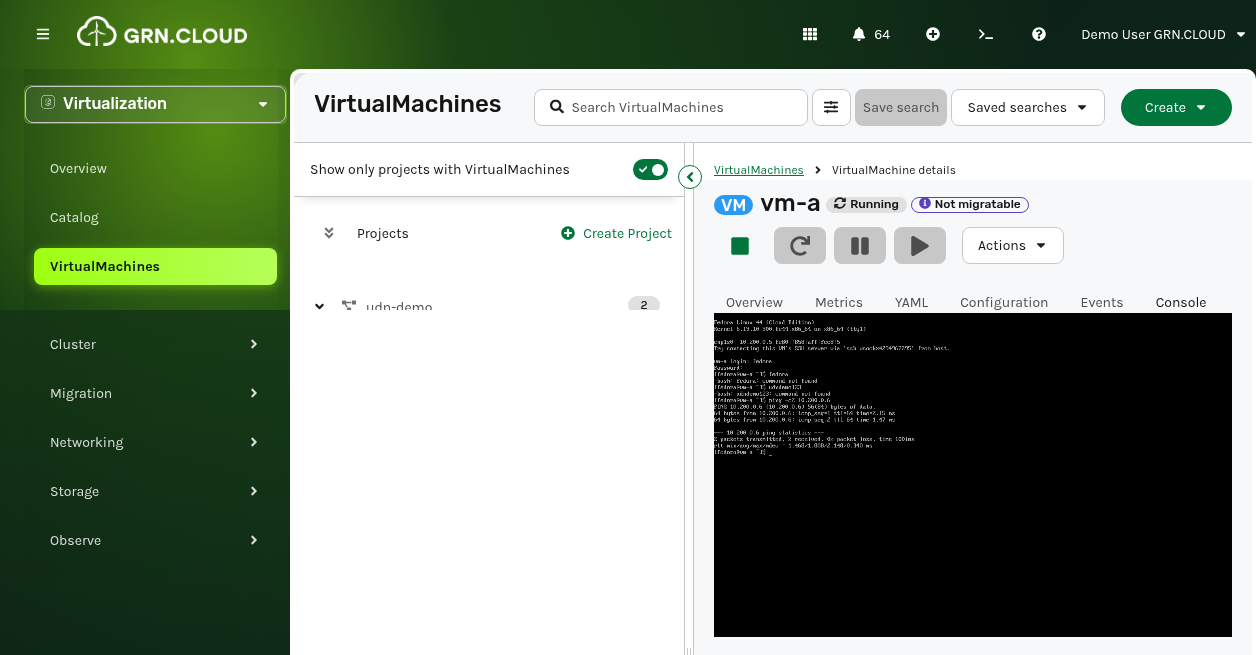
ping -c2 10.200.0.6 from vm-a to vm-b succeeds cleanly: 2 packets transmitted, 2 received,
0% packet loss - no extra configuration beyond the NetworkPolicy you already created - same
subnet, like two EC2 instances in one AWS private subnet.
4. Gated egress
Still in vm-a's console tab:
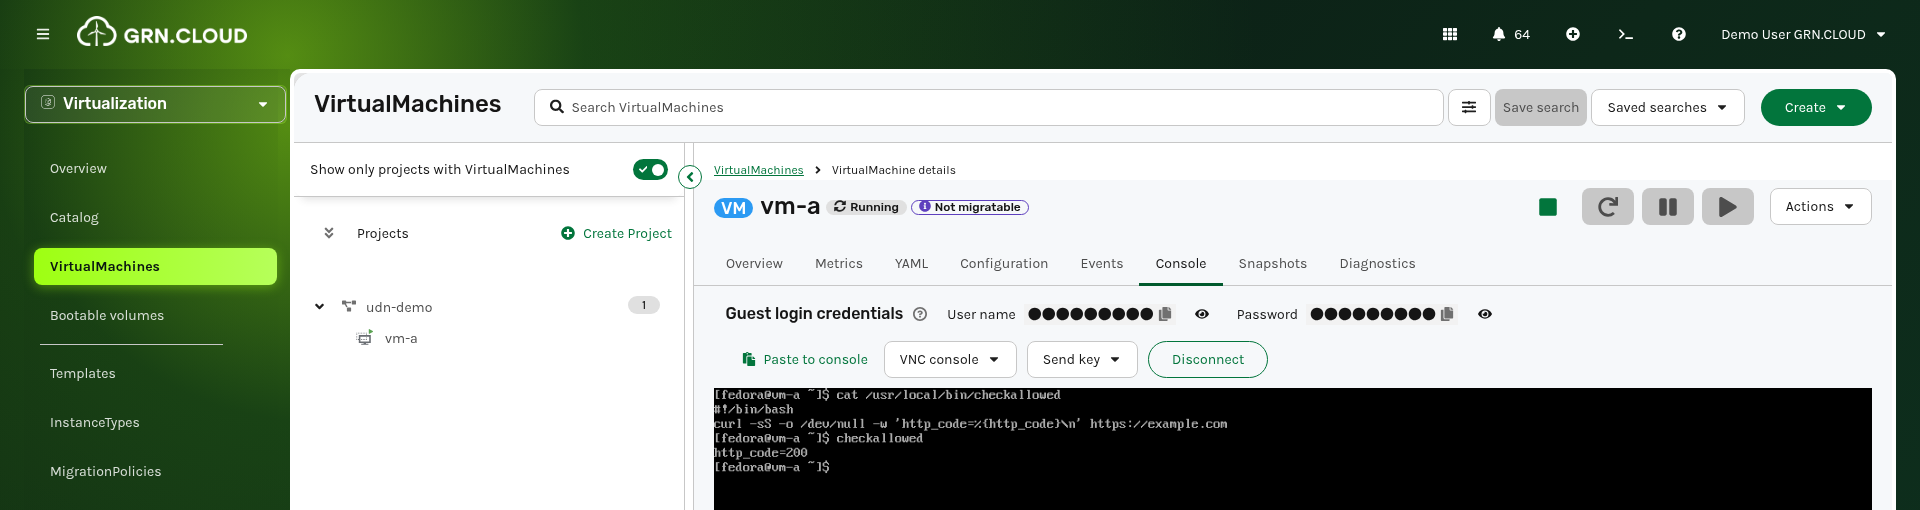
The screenshot shows the check as a tiny wrapper script (typing long curl/ping invocations
through a browser-based VNC console is unreliable) - cat prints its one line,
curl -sS -o /dev/null -w 'http_code=%{http_code}\n' https://example.com, then running it
returns http_code=200 - HTTPS and the DNS lookup it depends on are explicitly allowed.
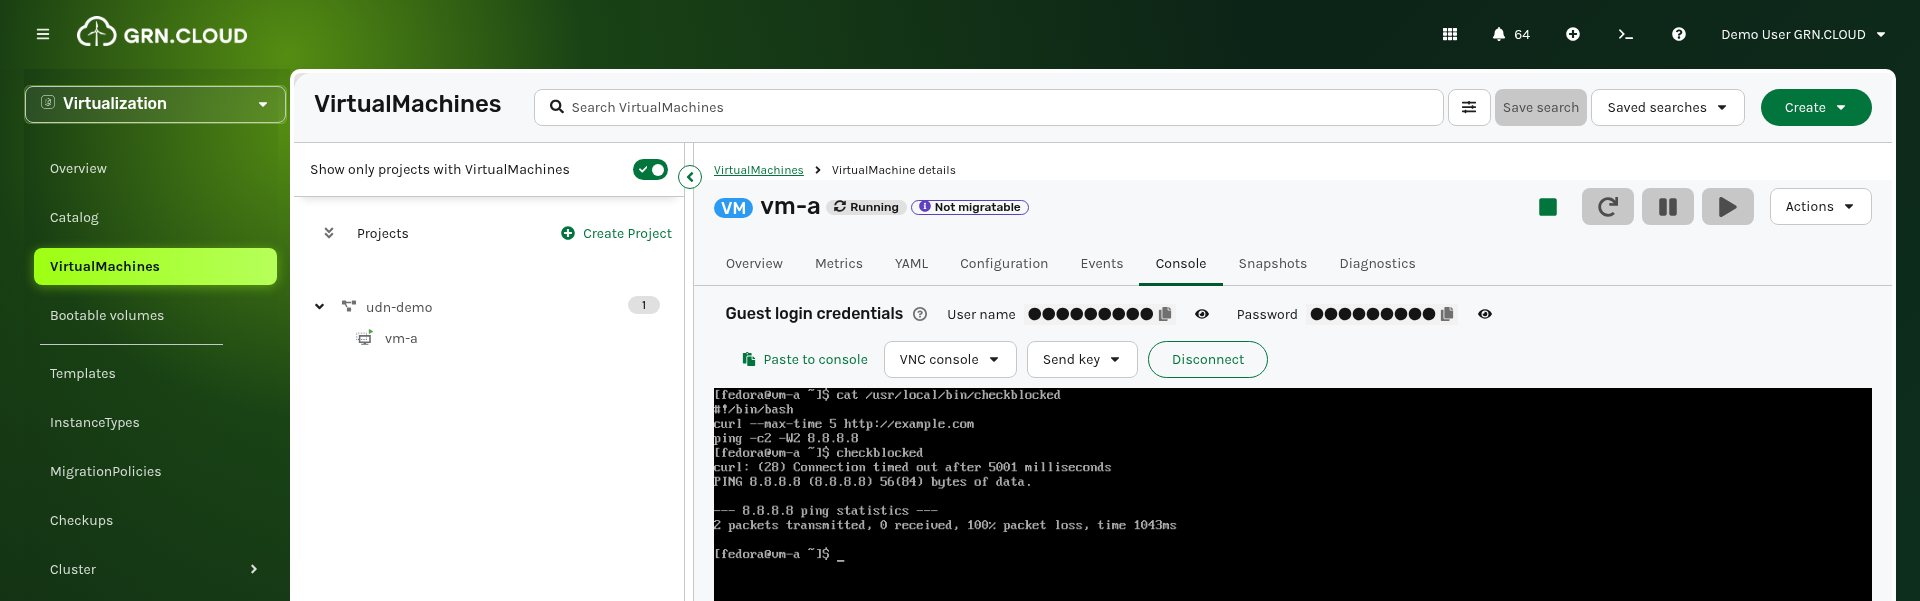
Same pattern: the script runs curl --max-time 5 http://example.com (times out with
curl: (28) Connection timed out) then ping -c2 -W2 8.8.8.8 (2 packets transmitted, 0
received, 100% packet loss) - everything that isn't explicitly allowed stays denied.
Same NetworkPolicy pair as the CLI guide, same result - HTTPS and DNS out, everything else denied.
Prefer the terminal?
The step-by-step CLI guide walks through the exact same example with oc apply -k,
including the full manifests for every resource shown above.